Friday, 17 January 2014

HP 3D Driveguard 6 in SCCM OSD Windows 7 x64 Task sequence

Back again with this issue, HP have released a new version of driveguard and this version has even more problems than the previous.It's taken me a bit of time but I've had to figured this out all over again :)

At the moment this guide works with the following models:

HP Elitebook 820 G1
HP Elitebook 850 G1


It most likely will work with many more, as HP tend to release a driveguard update every new generation of device. For this package I'm using sp64934.exe. If you are trying to automate an older version, see my other post.

Step 1) Download SP64934.exe from the HP support website.

2) Extract sp64934.exe with Winrar or 7-zip. Inside you will find another setup.exe file.


3) From an elevated command prompt, Extract the Installshield setup by running:

setup.exe /a /s /v"/qb TARGETDIR=c:\test\

You are now left with an MSI based setup in this folder:


4) Copy these files to your SCCM Distribution share and create a package with these files.


5) Within the package create a program “Install HP 3D Driveguard”  with the following command line:

Msiexec /i “HP 3D Driveguard.msi” /qn Reboot=ReallySuppress

6) Download Visual C++ Redistributable for Visual Studio 2012 Update 4 from here
http://www.microsoft.com/en-ca/download/confirmation.aspx?id=30679

Put this file inside your package source.

7) Create a new program in your package call “Install MS Visual C++ Redist 2012” with the following command line:

vcredist_x64.exe /install /quiet /norestart


8) Add to your task sequence as two separate steps – run the Visual Studio C++ first, then the driveguard. remember to use a WMI query to filter the install.


 9) import the "HP Mobile Data Protection Sensor" Driver to your driver package for the model you intend to build. You will find this in accelerometer.inf in the "Drivers" folder in extracted MSI files.

Now when you run the MSI, the drivers will already be present on your system and you will simply be installing the service to go along with them.

That's it! If this post helps you, please give me a +1 thanks!


Wednesday, 17 July 2013

How to get the MSI file from VMware-viclient-5.1.exe or any other VMware vSphere Client!


This guide works in general for any other version of VMWare Vsphere client, the installers have been packaged in pretty much the same way since I first used it in version 4.0. Why would you want to extract an MSI from the .exe even although it already supports silent installations you ask? Well, it’s true that it does, you can use the below command line string to extract from the pass commands into the internal MSI via the installshield wrapper.

vmware-viclient.exe /a /s /v" /qn TARGETDIR=C:\vSphereviclient5"

The issue I have with this is that it simply doesn’t work when being deployed via SCCM 2007. The reason for this is likely to be the contained prerequisite packages “vcredist_x64.exe” and “vcredist_x86.exe”. Most systems will already have these installed so all that’s happening here is unneeded complexity is being added to the package.

Follow the below steps if you want to grab that MSI!

1.   Right Click on the package and extract with either Winrar or 7-zip.This file is actually just a Winrar self extractor!


2.    You will be left with a new folder containing a “bin” and “redist” folder. We are only interested in the contents of the “bin” folder.


3.    Open the “Bin” folder and find “Vmware-viclient.exe” doubleclick this package to begin the installation.
 
4.   When the “welcome” screen appears don’t go any further. Instead browse to “C:\Users\yourusername\AppData\Local\Temp\”  (in W7 x64) .


5.    Inside here you will find a folder containing the MSI for the package. The name of the folder won’t be obvious; as it uses the MSI product code as the folder name, but if you do a “sort by date modified” the newest folders are likely to contain the package.


6.    You can now take all the files from here for deployment. As with any MSI you can use standard MSIEXEC commands to complete the installation:
eg: msiexec /i “Vmware vSphere Client 5.1.msi” Transforms=”1033.MST” REBOOT=REALLYSUPPRESS /qn for silent installation.
 
Or msiexec /i “Vmware vSphere Client 5.1.msi” Transforms=”1033.MST” REBOOT=REALLYSUPPRESS /qb for passive installation.
See http://support.microsoft.com/kb/314881 for a complete list of MSI switches.
 
If you run into difficulties with the system rebooting after installation automatically, you can edit this setting in the transforms file by using a program such as InstED.


Thursday, 11 July 2013

How to Uninstall SCCM 2007R3 Secondary site

I couldn't find any formal step-by-step guidance on this so I decided to create my own. I believe that below is all that is nessecery to completly remove the secondary site from the SCCM console. I've had to do this in situations where the the site is no longer required, or has to be rebuilt due to issues.


1.       Navigate to “site database” > “site management” > Select the site you with to uninstall.

2.       Browse to boundaries under the site and remove any active boundaries by right clicking and choosing “delete”.

3.       Reboot the secondary site.

4.       Open an Active Directory Users and Computers MMC

5.       Connect to the local domain controller at the location of the secondary site.

6.       Enable Advanced Features.

7.       Browse to : “System” > “System Management”
Verify that the entries for the boundaries you removed have disappeared from AD. (The OU will stay in there until the site is deleted but the address boundaries should disappear.


9.       Navigate to “site database” > “site management” > Right click on the secondary site you wish to uninstall.

10.       Follow the wizard through and select either delete or deinstall as appropriate to your situation.


11.       Click Finish.

12.       Monitor the logs for the primary site, when you see the below highlighted message the uninstall is completed.
 

13.       Right click on site database and click “refresh”. Verify that the site has disappeared from Site Management.


14.       Go into “site Database > Site Management > Your Primary site > Site Settings > Addresses” locate the old “standard address sender” with the old site code and right click on it and delete.

 
This won't leave the deleted secondary server in a completly "clean" state - any updates to SCCM you applied, hotfixes and package source folders will remain on the server. I would recomend doing a clean OS reinstall on this server before utilising it for any other purpose.


Saturday, 5 January 2013

My New Mini ITX build

It's a been a fair while since I built a new machine. It comes with it's own headaches compared to buying a pre-built system but there are several aspects I enjoy. The main factors that drive still drive me towards building myself are:

  • Customisation - I want to control every aspect of the design of the machine from looks to performance. The pre-built systems all tend to look very similar.
  • Cost - By reading reviews and doing my research I usually find I can build a cheaper PC than the leading manufacturers.
  • Off-the-shelf parts used - With a custom build I don't have to rely on Dell/HP etc. telling me what Graphics card will fit inside my computer - I can do the math for myself. I'm not tied into using them again if I want to replace my motherboard in the future - a standard board from any manufacturer will fit. This allows parts to be re-used in future builds such as case, power supply etc.
  • Quality of parts used - It's very common for the leading manufacturers to sell inferior quality parts, in general the graphics cards are usually clocked at slower speeds, contain slower memory and have inadequate cooling. In my experience the power supplies used are also barely adequate to run the supplied system.
  • Overclocking and tweaking - With a pre-built system you usually find the bios to be devoid of any overclocking options - they don't want to risk you messing with settings, breaking something and then having to contact them for replacement. Due to this they will usually ship with the higher-multiplier locked CPUs, forcing you to search for hacked BIOS' or resort to inferior software-based overclocking. 
This time I'm making this PC for some very different requirements, the main requirements are primarily to use as data storage. I have several Hard disk drives already which I want to reuse, but due to the relatively small capacity (500GB and 1TB) I wanted a case with as many drive bays as possible.

Initially I looked at something like below:

Cheap all-in-one boards like this can be a pretty good option. No CPU or third party heatsink to purchase. The fractal case also comes with it's own custom Power supply unit.


The idea was to have a completely quiet system with a passively cooled CPU, a nice big NAS enclosure (this one housed six 3.5" HDDS!)  - I would be re-using RAM I already have (2x4GB Corsair Vengence DDR3 1600) and the aforementioned HDDS. I planned to install a solution like FreeNAS. The only problem I have with this is the lack of versatility. I considered the costs and decided instead I could get a proper decent computer with it's own dedicated CPU,  mammoth cooler and possibly even have room for a dedicated graphics card. From this I could expect far better performance for the same price. A NAS box like above is fine as long as that's all it will ever be used for - I'm not that disciplined! I wanted instead to build a versatile system that I could upgrade the CPU without having to change the board. I could possibly even hi-jack the system for the weekend to take to a LAN(instead of taking my full-size Coolermaster 932 case!)

I came up with the spec below:

Zalman ZM500-GS, Asus P8H77-I, BitFenix Prodigy, Pentium G630.

 
I know the CPU is pretty weak, but this will change the future. For me this strikes a good balance if of performance vs. cost. 


The parts arrive and here are some images of the build process.

The new parts arrive

The power supply fitted - there is still ample room around it for cable management.


The Mini ITX board - this is the first time I've build a machine with this form-factor.


Basic shot of one of the removable hard disk bays.

CPU and Cooler and Ram were installed and then the board was fitted in with ease.

The system build complete

An extra two little cheeky 2.5" drives I was able to add on the side of the case.

Added a full-size Radeon 6870 for testing purposes.


First post to the annoying UEFI bios.

Windows 8 Install and running perfectly for testing purposes.

Now I've had time to play with the build here are some thoughts:

In conclusion, the build is good but not perfect. The case is too big to be a NAS/Media box - to put into perspective this is a bigger chassis than my 2005 Aspire X-Qpack and this housed a full micro atx board.

Above - the old 2005 Aspire X-Qpack - a great thing for LAN parties - when it didn't overheat!

The extra space is used mainly for the 5x (6 if you included the 5.25 bay) 3.5 HDD bays. I ended up putting in 4x 3.5 HDDs and 2x 2.5 HDD. Even then I felt that the noise-to-storage capacity/Energy consumption ratio was uneven. Essentially I could do with less HDDs, but larger than the currently installed 500GB drives. I also added in a full-size Radeon 6870 graphics card just for testing purposes and was able to make it fit by rotating the drive bays around to the face the other way. This works pretty well, but I did notice that the card came into contact with the removable drive-bay enclosure. I was able to get around this issue by putting in a small piece of anti-static bag. This works OK for my card, but cards with memory/heatsinks on both sides might struggle to fit with this design.

One major complaint is that the case doesn't have a built-in card reader and you must either choose a DVD drive or card reader in that single spare 5.25 bay. I ended up doing neither. In the future I may add a card reader into the 5.25" bay for convenience and use a USB DVD drive.

Cable management wise this case is pretty good except for the button board being housed on the side of the case (not sure why this was done as there was plenty of room left on the front of the case!) due to this you end up with some visible cable spaghetti-age. The Freezer 7 rev2 cooler is more than up to the job in this case, but with the RAM being so close to the ZIF socket the corsair vengeance heatsinks did not fit under this. My solution - remove the heatsinks! :)

Performance wise, pretty good (considering a 40 bucks CPU was used) and with the graphics card installed I was able to play Skyrim/Crysis Warhead at high settings fine. In the end I still haven't exactly decided how I'm going to be using this. Initially I bought this thinking I wanted to build a NAS/Media/VM box but now I'm considering replacing my desktop with this.

I know it doesn't really mean much - but here is the Windows experience index score on this machine.

Saturday, 29 September 2012

On-The-Fly WIM editing with WinToolkit


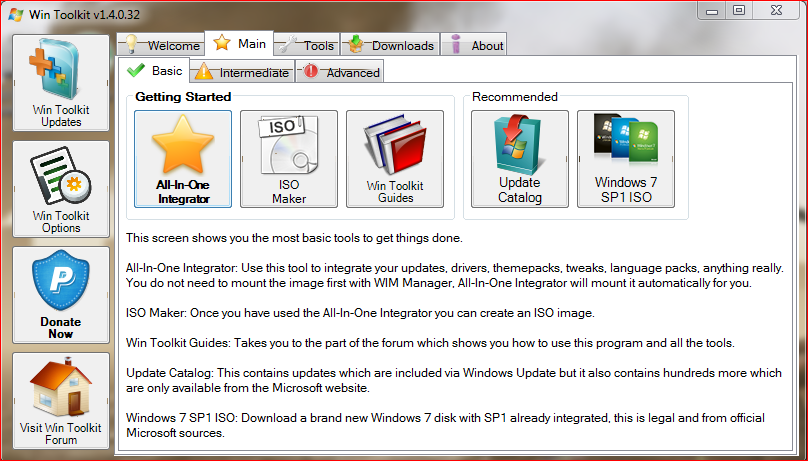
I recently discovered a tool called "Wintoolkit" by Legolash2o - see this link for a download. So far I've found the tool to be a great time-saver. It allows you to perform on-the-fly WIM file editing, without the need to use command-line tools.


Some of the great features include:

Windows Component Removal 

I used this to finally rid my WIM of Windows Media centre and default Aero theme packs - this was made easier due to the program having descriptions of each component, as well as some warnings about other users experiences of removing that particular component!


WIM Registry Editor 

After I had already done my WIM capture I later found several registry tweaks I wanted to make, instead of putting these into group policy or adding .reg files to my task sequence I've now managed to put these directly into the WIM file. This also helps with remote office deployment where a group policy update isn't always immediately possible - I used this to configure settings like Internet explorer proxy etc.


Update Integrator

The program provides a facility to download all the latest OS upgrades and then will effortlessly build them into the WIM file - no messing around with dism or imagex required. I don't do this every time an update is released, but adding new updates directly into the WIM file once a month seems like a good idea, it just cuts down on the number of windows updates the user will have to download when you give them the PC.


As you can see from the image above - it allows you to pretty much integrate anything you can think of - theme packs, gadgets, addons, drivers, wallpapers etc. 


Language Pack Converter

A handy little tool that converts language packs into .cab files - making it really easy to add additional display languages to your WIM file - this is very relevant for companies like mine who are trying to achieve a global standard.


 Office MSP Extractor

Download all the Microsoft office updates extract MSP files from the .exe - then easily drop them into your installation source. This obviously increases the size of your office deployment, but saves time the user will spend installing updates and gives your the security of knowing the estate is up-to-date.


 Much More...

So much more useful things in here, such as ISO maker, unattended creator, USB boot prep, WIM manager. I won't be using all of these features as some are more aimed at home user/small office deployment scenarios, but it's nice to see them included anyway.

I hope this saves someone else as much time as it did for me.

Andrew


Saturday, 8 September 2012

Finding and Deleting Duplicate Photos from your PC

Although I recently put a Solid state disk into my PC I've still been relying on a good old-fashioned mechanical disk to store my more precious data. Four 500GB Sata drives in Raid 10 holds everything from documents and letters to the family photo albums. Before I was content to have my photos on a raided drive with the infrequent backup to my server and an even more infrequent removable HDD dropped off at my dads house. With my son Nathan now just turned one I've developed  a new sense of fear for losing this data. Although the little man hasn't been around very long there has been thousands of photos taken of him and a surprisingly large volume of video clips.


Ideally what I would like to do is get all this data stored somewhere both secure, and reliable. But when I checked the size of the folder it came in at a whopping 107GB. Considering cloud based solutions such as Skydrive where you get 25GB free it was clear that this was never going to work.

The surprise of the sheer size of that folder got my interest in finding out what exactly was inside it! I began creating a new folder and started to organise photos into something more meaningful, but it wasn't long before I noticed a number of duplicates of the same photo.

It would appear that the problem is I'm too strict about keeping all photos - I want to keep *everything*. When synching up devices such as a camera phones, or cameras instead of overwriting existing images I allowed a new copy to be created. Add this up over the years with various photos been given to my from my family and then me backing them up again has created a folder with multiple nested folders with thousands of duplicates.

I decided that enough was enough and it was time to get rid of some of this - but how to start? It was clear that such a job couldn't be done manually. I turned my friend Mr Google to find my some software to do the job. I found programs like "Dup Detector" and "Doublekiller" after downloading and seeing annoying amateurish nagware and quickly finding out how garbage these programs were I eventually found my savior in a program called Visipics.

The reasons why Visipics is awesome are threefold.
  1. It's Free
  2. It's Awesome
  3. Did I mention it was free?
But the main reason to use Visipics is simply because it works and it's very easy to use. Just point the program at a directory and it will go through your photos and automatically find duplicates from the actual content of the image rather than just the file info as some other programs were using. You can adjust a simple slider to find images that are identical, nearly identical or slight variations of the same photos. Then it's a simple case of marking the photos you want to delete and pressing a big shiny "delete button".  After using Visipics I managed to get the size of my photos folder down to 28GB - in some cases I had twelve copies of the same photo. That's quite a saving.

OK, this won't impress everyone - but it did impress me!


Wednesday, 20 June 2012

HP 3D Driveguard in SCCM Windows 7 Task Sequence

UPDATE 18/01/2014 - as of HP Driveguard version 6 the below guide will no longer work. HP have changed the package and released yet another broken installer upon us. I've figured this new version out and you can read the latest guide here:HP Driveguard 6 Guide.
 

This was a real pain, one of the last things on my "to-do" list for the build I was creating was to fix the program called HP 3D Driveguard.

This solution works with the following models/packages that I know of, others are likely supported as the same .exe files are used across different HP ranges.


2530p sp47282.exe
2540p sp53795.exe
2560p sp53795.exe
6930p sp47282.exe
8440P sp53795.exe
8460P sp53795.exe
2570p sp57318.exe
8470p sp59282.exe
9470m sp59282.exe


In the past this would have been the kind of little OEM utility I would have totally ignored,but after reading about it, the benefits are pretty clear. In a nut-shell, the software provides free-fall protection for the hard disk on supported HP systems. The HP Elitebook series motherboard is equipped with an accelerometer which providing the driver is installed, instructs the disk head to "Park" when the computer is either in free-fall or being moved around. The end result is that you have fewer disk failures, which will translate into fewer man-hours being spent recovering data, logging calls with the OEM and then rebuilding the notebook.

Now, to make this clear, there is no problem to install this software either manually or via Altiris or SCCM, the issue I'm writing about today only occurs when building the PC with an SCCM task sequence.

The software is packaged with installshield and automated installation is rather easy with just the using these switches:

sp53795.exe -s /V /qn

The installer is designed to be able to pass switches into an internal MSI file (as indicated by the /qn switch) but even this doesn't seem to work correctly as it runs in passive mode rather than full silent mode. In an SCCM task sequence this fails to install completely.

Some Installshield packages can be flaky and require logging to be enabled, so I tried enabling logging by adding the /f2 switch, but still got the same error.

After loads of different approaches including putting the switch into a batch file, installing via "run command line" I still couldn't get this working. Although the OSD task sequence doesn't halt, looking back through the logs I can see that errors occurred.
Eventually I found the way to get this working and here are the steps:
  1. Extract the .exe file with Winrar
  2. Inside the folder you will see several files:

     3. Open up the command prompt and browse to this folder, enter:

      setup.exe /extractall

This will leave you with even more files, including.... two MSI files!


    4. Now you need to create a package in SCCM with all the files inside this folder.


 5. Within this package create a program as below:


The full switch is:
msiexec /i HPMDPAI3264.msi /qn REBOOT=ReallySuppress TRANSFORMS=HPMDPAI3264.mst

     6. Lastly, add the program to your OSD task sequence.


Ensure to tick the "continue on error" check box, the program will error during the installation, I believe this is caused by the suppression of the reboot.

And that's it folks. All very easy and intuitive eh? Why didn't we know how to do this straight off the bat? For me this is just another area where SCCM seems to behave very differently than normal automated installations. There is always the option of installing this software after OSD without having to go through all of this, but let's face it - if you go to the lengths of automating a full build, why would you settle for this?
So, you finally got it working and then logged onto Windows 7 but found no resident tray-icon? It appears HP are no longer doing this, if you want to check it installed successfully, look in the Programs and Features menu in control panel.

Hopefully this information is helpful to someone, and saves them the hours it took me to figure this one out.

Andrew