Showing posts with label Task Sequence. Show all posts

Friday, 17 January 2014

HP 3D Driveguard 6 in SCCM OSD Windows 7 x64 Task sequence

Back again with this issue, HP have released a new version of driveguard and this version has even more problems than the previous.It's taken me a bit of time but I've had to figured this out all over again :)

At the moment this guide works with the following models:

HP Elitebook 820 G1
HP Elitebook 850 G1


It most likely will work with many more, as HP tend to release a driveguard update every new generation of device. For this package I'm using sp64934.exe. If you are trying to automate an older version, see my other post.

Step 1) Download SP64934.exe from the HP support website.

2) Extract sp64934.exe with Winrar or 7-zip. Inside you will find another setup.exe file.


3) From an elevated command prompt, Extract the Installshield setup by running:

setup.exe /a /s /v"/qb TARGETDIR=c:\test\

You are now left with an MSI based setup in this folder:


4) Copy these files to your SCCM Distribution share and create a package with these files.


5) Within the package create a program “Install HP 3D Driveguard”  with the following command line:

Msiexec /i “HP 3D Driveguard.msi” /qn Reboot=ReallySuppress

6) Download Visual C++ Redistributable for Visual Studio 2012 Update 4 from here
http://www.microsoft.com/en-ca/download/confirmation.aspx?id=30679

Put this file inside your package source.

7) Create a new program in your package call “Install MS Visual C++ Redist 2012” with the following command line:

vcredist_x64.exe /install /quiet /norestart


8) Add to your task sequence as two separate steps – run the Visual Studio C++ first, then the driveguard. remember to use a WMI query to filter the install.


 9) import the "HP Mobile Data Protection Sensor" Driver to your driver package for the model you intend to build. You will find this in accelerometer.inf in the "Drivers" folder in extracted MSI files.

Now when you run the MSI, the drivers will already be present on your system and you will simply be installing the service to go along with them.

That's it! If this post helps you, please give me a +1 thanks!


Saturday, 29 September 2012

On-The-Fly WIM editing with WinToolkit


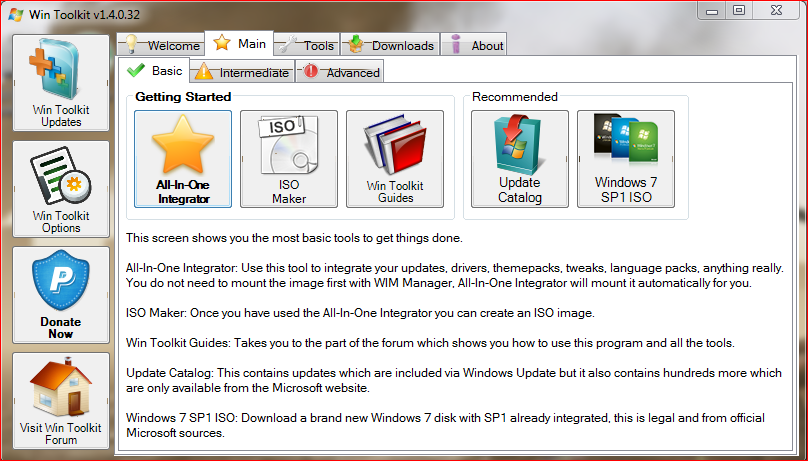
I recently discovered a tool called "Wintoolkit" by Legolash2o - see this link for a download. So far I've found the tool to be a great time-saver. It allows you to perform on-the-fly WIM file editing, without the need to use command-line tools.


Some of the great features include:

Windows Component Removal 

I used this to finally rid my WIM of Windows Media centre and default Aero theme packs - this was made easier due to the program having descriptions of each component, as well as some warnings about other users experiences of removing that particular component!


WIM Registry Editor 

After I had already done my WIM capture I later found several registry tweaks I wanted to make, instead of putting these into group policy or adding .reg files to my task sequence I've now managed to put these directly into the WIM file. This also helps with remote office deployment where a group policy update isn't always immediately possible - I used this to configure settings like Internet explorer proxy etc.


Update Integrator

The program provides a facility to download all the latest OS upgrades and then will effortlessly build them into the WIM file - no messing around with dism or imagex required. I don't do this every time an update is released, but adding new updates directly into the WIM file once a month seems like a good idea, it just cuts down on the number of windows updates the user will have to download when you give them the PC.


As you can see from the image above - it allows you to pretty much integrate anything you can think of - theme packs, gadgets, addons, drivers, wallpapers etc. 


Language Pack Converter

A handy little tool that converts language packs into .cab files - making it really easy to add additional display languages to your WIM file - this is very relevant for companies like mine who are trying to achieve a global standard.


 Office MSP Extractor

Download all the Microsoft office updates extract MSP files from the .exe - then easily drop them into your installation source. This obviously increases the size of your office deployment, but saves time the user will spend installing updates and gives your the security of knowing the estate is up-to-date.


 Much More...

So much more useful things in here, such as ISO maker, unattended creator, USB boot prep, WIM manager. I won't be using all of these features as some are more aimed at home user/small office deployment scenarios, but it's nice to see them included anyway.

I hope this saves someone else as much time as it did for me.

Andrew


Wednesday, 20 June 2012

HP 3D Driveguard in SCCM Windows 7 Task Sequence

UPDATE 18/01/2014 - as of HP Driveguard version 6 the below guide will no longer work. HP have changed the package and released yet another broken installer upon us. I've figured this new version out and you can read the latest guide here:HP Driveguard 6 Guide.
 

This was a real pain, one of the last things on my "to-do" list for the build I was creating was to fix the program called HP 3D Driveguard.

This solution works with the following models/packages that I know of, others are likely supported as the same .exe files are used across different HP ranges.


2530p sp47282.exe
2540p sp53795.exe
2560p sp53795.exe
6930p sp47282.exe
8440P sp53795.exe
8460P sp53795.exe
2570p sp57318.exe
8470p sp59282.exe
9470m sp59282.exe


In the past this would have been the kind of little OEM utility I would have totally ignored,but after reading about it, the benefits are pretty clear. In a nut-shell, the software provides free-fall protection for the hard disk on supported HP systems. The HP Elitebook series motherboard is equipped with an accelerometer which providing the driver is installed, instructs the disk head to "Park" when the computer is either in free-fall or being moved around. The end result is that you have fewer disk failures, which will translate into fewer man-hours being spent recovering data, logging calls with the OEM and then rebuilding the notebook.

Now, to make this clear, there is no problem to install this software either manually or via Altiris or SCCM, the issue I'm writing about today only occurs when building the PC with an SCCM task sequence.

The software is packaged with installshield and automated installation is rather easy with just the using these switches:

sp53795.exe -s /V /qn

The installer is designed to be able to pass switches into an internal MSI file (as indicated by the /qn switch) but even this doesn't seem to work correctly as it runs in passive mode rather than full silent mode. In an SCCM task sequence this fails to install completely.

Some Installshield packages can be flaky and require logging to be enabled, so I tried enabling logging by adding the /f2 switch, but still got the same error.

After loads of different approaches including putting the switch into a batch file, installing via "run command line" I still couldn't get this working. Although the OSD task sequence doesn't halt, looking back through the logs I can see that errors occurred.
Eventually I found the way to get this working and here are the steps:
  1. Extract the .exe file with Winrar
  2. Inside the folder you will see several files:

     3. Open up the command prompt and browse to this folder, enter:

      setup.exe /extractall

This will leave you with even more files, including.... two MSI files!


    4. Now you need to create a package in SCCM with all the files inside this folder.


 5. Within this package create a program as below:


The full switch is:
msiexec /i HPMDPAI3264.msi /qn REBOOT=ReallySuppress TRANSFORMS=HPMDPAI3264.mst

     6. Lastly, add the program to your OSD task sequence.


Ensure to tick the "continue on error" check box, the program will error during the installation, I believe this is caused by the suppression of the reboot.

And that's it folks. All very easy and intuitive eh? Why didn't we know how to do this straight off the bat? For me this is just another area where SCCM seems to behave very differently than normal automated installations. There is always the option of installing this software after OSD without having to go through all of this, but let's face it - if you go to the lengths of automating a full build, why would you settle for this?
So, you finally got it working and then logged onto Windows 7 but found no resident tray-icon? It appears HP are no longer doing this, if you want to check it installed successfully, look in the Programs and Features menu in control panel.

Hopefully this information is helpful to someone, and saves them the hours it took me to figure this one out.

Andrew