Showing posts with label Deploy. Show all posts

Wednesday, 17 July 2013

How to get the MSI file from VMware-viclient-5.1.exe or any other VMware vSphere Client!


This guide works in general for any other version of VMWare Vsphere client, the installers have been packaged in pretty much the same way since I first used it in version 4.0. Why would you want to extract an MSI from the .exe even although it already supports silent installations you ask? Well, it’s true that it does, you can use the below command line string to extract from the pass commands into the internal MSI via the installshield wrapper.

vmware-viclient.exe /a /s /v" /qn TARGETDIR=C:\vSphereviclient5"

The issue I have with this is that it simply doesn’t work when being deployed via SCCM 2007. The reason for this is likely to be the contained prerequisite packages “vcredist_x64.exe” and “vcredist_x86.exe”. Most systems will already have these installed so all that’s happening here is unneeded complexity is being added to the package.

Follow the below steps if you want to grab that MSI!

1.   Right Click on the package and extract with either Winrar or 7-zip.This file is actually just a Winrar self extractor!


2.    You will be left with a new folder containing a “bin” and “redist” folder. We are only interested in the contents of the “bin” folder.


3.    Open the “Bin” folder and find “Vmware-viclient.exe” doubleclick this package to begin the installation.
 
4.   When the “welcome” screen appears don’t go any further. Instead browse to “C:\Users\yourusername\AppData\Local\Temp\”  (in W7 x64) .


5.    Inside here you will find a folder containing the MSI for the package. The name of the folder won’t be obvious; as it uses the MSI product code as the folder name, but if you do a “sort by date modified” the newest folders are likely to contain the package.


6.    You can now take all the files from here for deployment. As with any MSI you can use standard MSIEXEC commands to complete the installation:
eg: msiexec /i “Vmware vSphere Client 5.1.msi” Transforms=”1033.MST” REBOOT=REALLYSUPPRESS /qn for silent installation.
 
Or msiexec /i “Vmware vSphere Client 5.1.msi” Transforms=”1033.MST” REBOOT=REALLYSUPPRESS /qb for passive installation.
See http://support.microsoft.com/kb/314881 for a complete list of MSI switches.
 
If you run into difficulties with the system rebooting after installation automatically, you can edit this setting in the transforms file by using a program such as InstED.


Saturday, 29 September 2012

On-The-Fly WIM editing with WinToolkit


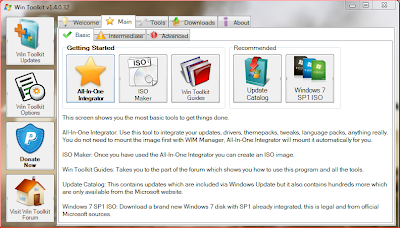
I recently discovered a tool called "Wintoolkit" by Legolash2o - see this link for a download. So far I've found the tool to be a great time-saver. It allows you to perform on-the-fly WIM file editing, without the need to use command-line tools.


Some of the great features include:

Windows Component Removal 

I used this to finally rid my WIM of Windows Media centre and default Aero theme packs - this was made easier due to the program having descriptions of each component, as well as some warnings about other users experiences of removing that particular component!


WIM Registry Editor 

After I had already done my WIM capture I later found several registry tweaks I wanted to make, instead of putting these into group policy or adding .reg files to my task sequence I've now managed to put these directly into the WIM file. This also helps with remote office deployment where a group policy update isn't always immediately possible - I used this to configure settings like Internet explorer proxy etc.


Update Integrator

The program provides a facility to download all the latest OS upgrades and then will effortlessly build them into the WIM file - no messing around with dism or imagex required. I don't do this every time an update is released, but adding new updates directly into the WIM file once a month seems like a good idea, it just cuts down on the number of windows updates the user will have to download when you give them the PC.


As you can see from the image above - it allows you to pretty much integrate anything you can think of - theme packs, gadgets, addons, drivers, wallpapers etc. 


Language Pack Converter

A handy little tool that converts language packs into .cab files - making it really easy to add additional display languages to your WIM file - this is very relevant for companies like mine who are trying to achieve a global standard.


 Office MSP Extractor

Download all the Microsoft office updates extract MSP files from the .exe - then easily drop them into your installation source. This obviously increases the size of your office deployment, but saves time the user will spend installing updates and gives your the security of knowing the estate is up-to-date.


 Much More...

So much more useful things in here, such as ISO maker, unattended creator, USB boot prep, WIM manager. I won't be using all of these features as some are more aimed at home user/small office deployment scenarios, but it's nice to see them included anyway.

I hope this saves someone else as much time as it did for me.

Andrew


Tuesday, 20 December 2011

A modular approch to Altiris Deployment Console Software Installs.


One thing that always annoyed me about Altiris was that when working with multiple servers there was no way to load balance or route traffic based upon the closest server, instead Altiris would try and push everything from the central site. The work-around is that you would have to create multiple jobs for the one piece of software which can get very tedious, is prone to human error and generally looks very messy in your deployment console! Thanks to the scheduling features in Altiris publishing smaller applications wasn't such a big deal even if your WAN link wasn't great, but when you have to deploy something as big as Office 2010 you begin to appreciate the scale of the problem. In this post I will show you my method of dynamically mapping to the closest server and take on a modular approach which you can use time-and-again in all your deployment jobs.

It all starts with a good drive mapping script


As I mentioned previously, informing the Altiris server to use the closest distribution point instead of one that is potentially hundreds of miles away can't be achieved using the standard "Add copy file job". Instead we turn to VBscript.


The script below will do the following tasks:
  1. Inform the client to ping a list of Altiris servers
  2. Clear the required drive letter on the client PC (W: in this example)
  3. Map a drive letter to the closest Altiris distribution point based upon ping response time.
  4. If the user is logged on it will use the users credentials to map the drive.
  5. If no user is logged on it will use a system account.

' Drive mapping script by Andrew Allison 07/06/2011
' Pings all Altris servers in the array and maps a drive as w: to the one with lowest response time
' if user is logged on uses user credentials to map drive, if no uses domain account specified in uzername variable
'****************************************************************************************************


'array holding list of altiris distribution servers
Dim arr : arr = Array( "server1" , "server2" , "server3" , "server4" , "server5" )
Dim out
Call ServersByPingTime( arr , out , True )
Dim s
'WScript.Echo "In order fastest to slowest: "
For Each S in out
'WScript.Echo s
'document.write(s(0))
Next
'WScript.Echo(out(0))
lowestping =(out(0))
'wscript.echo lowestping

strComputer = "."
Set objWMIService = GetObject("winmgmts:" _
& "{impersonationLevel=impersonate}!\\" & strComputer & "\root\cimv2")
Set colComputer = objWMIService.ExecQuery _
("Select * from Win32_ComputerSystem")
For Each objComputer in colComputer
'Wscript.Echo objComputer.UserName
If IsNull(objComputer.UserName) Then 'If no one is logged on
        strLoggedOn = "No"
    Else
        strLoggedOn = "Yes"
    End If
'wscript.echo strLoggedOn
Next


Dim objNetwork
Dim strDriveLetter, strRemotePath
Dim u_name_pserver, p_word_pserver
Dim strProfile
Dim uzername
Dim p4ssword


'specifies domain account to use to map the drive in the event no user is currently logged on
uzername="yourdomain\domainadminaccount" 
p4ssword="youraccountpasword"
strProfile = "true"

'specifies drive letter to use
strDriveLetter = "w:"
'specifies the servername and path to distribution share
strRemotePath = "\\"& lowestping &"\yourshare"

on error resume next
Set objNetwork = CreateObject("WScript.Network")
'if no user logged on then remove the drive letter in case it is currently mapped to somewhere else
If strLoggedOn = "No" then
objNetwork.RemoveNetworkDrive strDriveLetter
wscript.sleep 5000

'map the drive letter using domain account
objNetwork.MapNetworkDrive strDriveLetter, strRemotePath, strprofile, uzername, p4ssword
Else

'map the drive using the users current credentials
objNetwork.RemoveNetworkDrive strDriveLetter
wscript.sleep 5000
objNetwork.MapNetworkDrive strDriveLetter, strRemotePath
end if

' Begin pinging all servers and sort by fastest response time
Function Ping(strHost , ByRef bytesSent , ByRef bytesReceived , _
         ByRef bytesLost , ByRef minMs , ByRef maxMs , ByRef aveMs )
 Ping = False
 Dim objShell, objExec, strPingResults, bRet
 Set objShell = CreateObject("WScript.Shell")
 Set objExec = objShell.Exec("ping -n 1 " & strHost)
 Do
     WScript.Sleep 100
 Loop Until objExec.Status <> 0
 strPingResults = objExec.StdOut.ReadAll
 Dim regexpingstats : Set regexpingstats = new regexp
  regexpingstats.Pattern = "Packets:\s+Sent\s+=\s+([0-9]+).*Received" & _
                           "\s+=\s+([0-9]+).*Lost\s+=\s+([0-9]+)(?:.*\s)+" & _
                           "Minimum\s+=\s+([0-9]+)ms.*Maximum\s+=\s+" & _
                           "([0-9]+)ms.*Average\s+=\s+([0-9]+)ms"
 regexpingstats.Global = True
 regexpingstats.IgnoreCase = True
 regexpingstats.MultiLine = True
 If regexpingstats.Test(strPingResults) Then
  Dim m : Set m = regexpingstats.Execute(strPingResults)
  bytesSent = CInt(m.Item(0).subMatches.Item(0))
  bytesReceived = CInt(m.Item(0).subMatches.Item(1))
  bytesLost = CInt(m.Item(0).subMatches.Item(2))
  minMs = CInt(m.Item(0).subMatches.Item(3))
  maxMs = CInt(m.Item(0).subMatches.Item(4))
  aveMs = CInt(m.Item(0).subMatches.Item(5))
  Ping = Eval( bytesSent > bytesLost )
 End If
End Function

'Returns false if no server were found alive
'outSortedByMs - array sorted fastest response to slowest response time
Public Function ServersByPingTime( ByVal inSeverList , _
                ByRef outSortedByMs , bVerbose )
  On Error Resume Next
  ServersByPingTime = False
  outLivingSorted = Array
  Dim s, i , j , temp
  If bVerbose Then
  For Each s In inSeverList
   If bVerbose Then wscript.StdOut.Write("        Server: " & s )
   Dim bs, br, bl, mi , ma , av
   If Ping( s , bs, br, bl, mi , ma , av ) Then
    If bVerbose Then
     'WScript.Echo(" [Passed]")
     'WScript.Echo("    Bytes Sent: " & bs )
     'WScript.Echo("    Bytes Recv: " & br )
     'WScript.Echo("    Bytes Lost: " & bl )
     'WScript.Echo("        Min ms: " & mi )
     'WScript.Echo("        Max ms: " & ma )
     'WScript.Echo("    Average ms: " & av )
    End If
    i = UBound(outLivingSorted) + 1 
    ReDim Preserve outLivingSorted(i)
    outLivingSorted(i) = Array(s,av)
    ServersByPingTime = True ' Success there are servers alive...
   Else
    If bVerbose Then
    ' WScript.Echo(" [Failed]")
    ' WScript.Echo("")
    End if
   End If
  Next
  'Sort...
  For i = UBound(outLivingSorted) - 1 To 0 Step -1
    For j = 0 To i
      If outLivingSorted(j)(1) > outLivingSorted(j+1)(1) Then
         temp=outLivingSorted(j+1)
         outLivingSorted(j+1)=outLivingSorted(j)
         outLivingSorted(j)=temp
      End If
    Next
  Next

  'Temp array to store the new pinged and sorted by reponse time...
  Dim temparray
  ReDim temparray(UBound(outLivingSorted))
  For i = 0 To UBound(outLivingSorted)
    temparray(i) = outLivingSorted(i)(0)
  Next
  outSortedByMs = temparray
end if
End Function
wscript.quit


Copy the files down to the local PC

You probably are wondering why not just use the built in "Copy File to" function in Altiris? Well I've tested this with not really much success. If you specify a drive letter in this function for Altiris to use it will think that W: is in fact a local drive in the Altiris server. You can't specify UNC as this will defeat the purpose of the above script.


I find that my installers behave themselves much better when the are copied to the PC first before installing, using my method here creates a little layer of complexity, as you will require to synchronise the content on all Altiris servers, but overall it's worth it to ensure that no matter what site a machine is based in, you won't kill the WAN and the install won't take forever. Below is an example script, all it does is copy the files down, you will end up a new "copy file to" script for each app you own, ensure to save the name as something meaningful.


'Copy Folder contents to the specified folder
'Last update 10/08/10 by Andrew Allison

'**************************************************
On Error Resume Next
dim WshShell, oShell, sCmd, i, objFSO, objFolder, strDirectory1

Set WshShell = WScript.CreateObject("WScript.Shell")
Set objSysInfo = CreateObject("ADSystemInfo")
Set objNetwork = CreateObject("Wscript.Network")
Set WshNetwork = WScript.CreateObject("WScript.Network")
Set objShell = CreateObject("Wscript.Shell")
Set oShell = CreateObject("Wscript.Shell")
Set WshEnv = WshShell.Environment("PROCESS")
Set objFSO = CreateObject("Scripting.FileSystemObject")

Const OverWriteFiles = True
strComputer = "."

'Creates the Support Directory on the C drive
 strDirectory1 = "c:\support"
 Set objFSO = CreateObject("Scripting.FileSystemObject")
 Set objFolder = objFSO.CreateFolder(strDirectory1)

' Disables the Open File security warning.
WshEnv("SEE_MASK_NOZONECHECKS") = 1

 objFSO.CopyFolder "W:\yourfolder" , "C:\support\yourfolder\" , OverWriteFiles

i = oShell.Run(sCmd,1,true)
' Enables the Open File security warning again.
WshEnv.Remove("SEE_MASK_NOZONECHECKS")

wscript.Quit


Send the Install command

The installation command will obviously be different depending the program and installation package type. MSI files are generally much easier to work with than most others. There is not really any benefit of having this part in as VBscript, although it is entirely possible. I have to admit that usually I just use the "Run Script" command in Altiris and then type in the install string and full path to the "c:\support" directory.


Clean up the drive letter

After the install has been completed you will always want to ensure you remove the drive letter. You don't really want your users snooping around on your distribution points.

Option Explicit
on error resume next
Dim objShell, objNetwork, DriveLetter1

DriveLetter1 = "w:"
Set objShell = CreateObject("WScript.Shell")
Set objNetwork = CreateObject("WScript.Network")

objNetwork.RemoveNetworkDrive DriveLetter1
Wscript.Quit


The whole process looks a little like this for each deployment job. This example  is Autodesk DWG Trueview, the "run script" sections below represent many prerequisite software installations. Luckily you can simply run one after another.