Showing posts with label MSI. Show all posts

Friday, 16 February 2018

HP Wireless Button Driver - How to Get that MSI!


Here's how to extract the MSI for the "Wireless Button driver" for use in MDT/SCCM sequence.


  1. Download the softpack direct from HP's website. In the example here I'm using SP77524 from the Elitebook 820 G3.

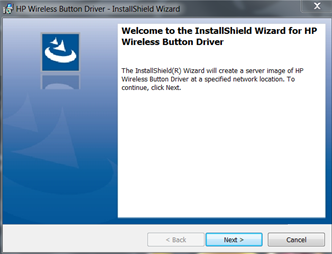
  1. Open an elevated command prompt and at the directory you stored the file and type "setup.exe /a"


You will see a wizard appear. Don't click anything on this, leave it open.


  1. In file explorer browse to the "c:\users\%yourusername%\Appdata\local\temp folder.

Order the files and folders by date modified. You will see one at the time you ran the installer, open this folder and inside will be the required MSI along with other required installation files.


You can now take the contents of this folder and add to a deployment package. A silent installation can by performed by running msiexec /I "HP Wireless Button Driver.msi" /qn TRANSFORMS=1033.MST 

If this helps you please don't forget to leave me a +1. Many thanks

Friday, 17 January 2014

HP 3D Driveguard 6 in SCCM OSD Windows 7 x64 Task sequence

Back again with this issue, HP have released a new version of driveguard and this version has even more problems than the previous.It's taken me a bit of time but I've had to figured this out all over again :)

At the moment this guide works with the following models:

HP Elitebook 820 G1
HP Elitebook 850 G1


It most likely will work with many more, as HP tend to release a driveguard update every new generation of device. For this package I'm using sp64934.exe. If you are trying to automate an older version, see my other post.

Step 1) Download SP64934.exe from the HP support website.

2) Extract sp64934.exe with Winrar or 7-zip. Inside you will find another setup.exe file.


3) From an elevated command prompt, Extract the Installshield setup by running:

setup.exe /a /s /v"/qb TARGETDIR=c:\test\

You are now left with an MSI based setup in this folder:


4) Copy these files to your SCCM Distribution share and create a package with these files.


5) Within the package create a program “Install HP 3D Driveguard”  with the following command line:

Msiexec /i “HP 3D Driveguard.msi” /qn Reboot=ReallySuppress

6) Download Visual C++ Redistributable for Visual Studio 2012 Update 4 from here
http://www.microsoft.com/en-ca/download/confirmation.aspx?id=30679

Put this file inside your package source.

7) Create a new program in your package call “Install MS Visual C++ Redist 2012” with the following command line:

vcredist_x64.exe /install /quiet /norestart


8) Add to your task sequence as two separate steps – run the Visual Studio C++ first, then the driveguard. remember to use a WMI query to filter the install.


 9) import the "HP Mobile Data Protection Sensor" Driver to your driver package for the model you intend to build. You will find this in accelerometer.inf in the "Drivers" folder in extracted MSI files.

Now when you run the MSI, the drivers will already be present on your system and you will simply be installing the service to go along with them.

That's it! If this post helps you, please give me a +1 thanks!


Wednesday, 17 July 2013

How to get the MSI file from VMware-viclient-5.1.exe or any other VMware vSphere Client!


This guide works in general for any other version of VMWare Vsphere client, the installers have been packaged in pretty much the same way since I first used it in version 4.0. Why would you want to extract an MSI from the .exe even although it already supports silent installations you ask? Well, it’s true that it does, you can use the below command line string to extract from the pass commands into the internal MSI via the installshield wrapper.

vmware-viclient.exe /a /s /v" /qn TARGETDIR=C:\vSphereviclient5"

The issue I have with this is that it simply doesn’t work when being deployed via SCCM 2007. The reason for this is likely to be the contained prerequisite packages “vcredist_x64.exe” and “vcredist_x86.exe”. Most systems will already have these installed so all that’s happening here is unneeded complexity is being added to the package.

Follow the below steps if you want to grab that MSI!

1.   Right Click on the package and extract with either Winrar or 7-zip.This file is actually just a Winrar self extractor!


2.    You will be left with a new folder containing a “bin” and “redist” folder. We are only interested in the contents of the “bin” folder.


3.    Open the “Bin” folder and find “Vmware-viclient.exe” doubleclick this package to begin the installation.
 
4.   When the “welcome” screen appears don’t go any further. Instead browse to “C:\Users\yourusername\AppData\Local\Temp\”  (in W7 x64) .


5.    Inside here you will find a folder containing the MSI for the package. The name of the folder won’t be obvious; as it uses the MSI product code as the folder name, but if you do a “sort by date modified” the newest folders are likely to contain the package.


6.    You can now take all the files from here for deployment. As with any MSI you can use standard MSIEXEC commands to complete the installation:
eg: msiexec /i “Vmware vSphere Client 5.1.msi” Transforms=”1033.MST” REBOOT=REALLYSUPPRESS /qn for silent installation.
 
Or msiexec /i “Vmware vSphere Client 5.1.msi” Transforms=”1033.MST” REBOOT=REALLYSUPPRESS /qb for passive installation.
See http://support.microsoft.com/kb/314881 for a complete list of MSI switches.
 
If you run into difficulties with the system rebooting after installation automatically, you can edit this setting in the transforms file by using a program such as InstED.


Wednesday, 20 June 2012

HP 3D Driveguard in SCCM Windows 7 Task Sequence

UPDATE 18/01/2014 - as of HP Driveguard version 6 the below guide will no longer work. HP have changed the package and released yet another broken installer upon us. I've figured this new version out and you can read the latest guide here:HP Driveguard 6 Guide.
 

This was a real pain, one of the last things on my "to-do" list for the build I was creating was to fix the program called HP 3D Driveguard.

This solution works with the following models/packages that I know of, others are likely supported as the same .exe files are used across different HP ranges.


2530p sp47282.exe
2540p sp53795.exe
2560p sp53795.exe
6930p sp47282.exe
8440P sp53795.exe
8460P sp53795.exe
2570p sp57318.exe
8470p sp59282.exe
9470m sp59282.exe


In the past this would have been the kind of little OEM utility I would have totally ignored,but after reading about it, the benefits are pretty clear. In a nut-shell, the software provides free-fall protection for the hard disk on supported HP systems. The HP Elitebook series motherboard is equipped with an accelerometer which providing the driver is installed, instructs the disk head to "Park" when the computer is either in free-fall or being moved around. The end result is that you have fewer disk failures, which will translate into fewer man-hours being spent recovering data, logging calls with the OEM and then rebuilding the notebook.

Now, to make this clear, there is no problem to install this software either manually or via Altiris or SCCM, the issue I'm writing about today only occurs when building the PC with an SCCM task sequence.

The software is packaged with installshield and automated installation is rather easy with just the using these switches:

sp53795.exe -s /V /qn

The installer is designed to be able to pass switches into an internal MSI file (as indicated by the /qn switch) but even this doesn't seem to work correctly as it runs in passive mode rather than full silent mode. In an SCCM task sequence this fails to install completely.

Some Installshield packages can be flaky and require logging to be enabled, so I tried enabling logging by adding the /f2 switch, but still got the same error.

After loads of different approaches including putting the switch into a batch file, installing via "run command line" I still couldn't get this working. Although the OSD task sequence doesn't halt, looking back through the logs I can see that errors occurred.
Eventually I found the way to get this working and here are the steps:
  1. Extract the .exe file with Winrar
  2. Inside the folder you will see several files:

     3. Open up the command prompt and browse to this folder, enter:

      setup.exe /extractall

This will leave you with even more files, including.... two MSI files!


    4. Now you need to create a package in SCCM with all the files inside this folder.


 5. Within this package create a program as below:


The full switch is:
msiexec /i HPMDPAI3264.msi /qn REBOOT=ReallySuppress TRANSFORMS=HPMDPAI3264.mst

     6. Lastly, add the program to your OSD task sequence.


Ensure to tick the "continue on error" check box, the program will error during the installation, I believe this is caused by the suppression of the reboot.

And that's it folks. All very easy and intuitive eh? Why didn't we know how to do this straight off the bat? For me this is just another area where SCCM seems to behave very differently than normal automated installations. There is always the option of installing this software after OSD without having to go through all of this, but let's face it - if you go to the lengths of automating a full build, why would you settle for this?
So, you finally got it working and then logged onto Windows 7 but found no resident tray-icon? It appears HP are no longer doing this, if you want to check it installed successfully, look in the Programs and Features menu in control panel.

Hopefully this information is helpful to someone, and saves them the hours it took me to figure this one out.

Andrew

Sunday, 18 December 2011

Installing Exchange System Manager for Windows Vista on Windows 7 x64

Like many companies mine has not yet got around to upgrading to Exchange 2007 or 2010. When you want to encourage the move to a full Windows 7 environment this can be an issue as there are no management tools available for this older version of Exchange. The last thing you want is to have all admins logging onto the server to check simple things such as tiers, configure addresses etc.

Luckily Microsoft did release Exchange System Manager for Windows Vista - but a badly configured MSI means that you won't be able to install this on Windows 7.


Even when attempting to run the program in compatibility mode you are still greeted with the same unfriendly error message.


Fortunately I found a way around this. You will require to install an MSI editor such as InstEd or Orca. I personally prefer InstEd as it has many more features. Simply open up the MSI in InstEd and navigate to "InstallUISequence" and select the "CA_SET_ERROR_MSG" and "FatalErrorDialog" entries, right click and choose "Delete Rows".


You can now click "File" > "Save as" > "ESMVISTA_FIXED.MSI". You should now be able to run the installer without any annoying warnings. I have tested this over the last few weeks and it works flawlessly.


Ah - good old T&C - a welcome sight.

Fully installed and working

As it turns out, The Exchange Management tools are not the only program affected by this issue. So far using this method I have managed to resolve issues with Cisco Unified Desktop Supervisor, Agent and Cisco Unified Desktop Administrator. The rows you have to delete are going to be a little different, but usually it's a rather obvious OS check that is pretty easy to spot. If you decide to use this tip just be sure to inform you manager that this is work-around, not a permanent fix - the moment you do this you are saying that you need no support from the supplier.

Andrew