Friday 23 March 2018

Silently Deploying OneDrive for Business with SCCM and Migrating user profile with zero User Interaction.


Pre-requisite Tasks

Download the Latest Version of OneDrive from:

Download the Latest OneDrive for Business ADMX template.

Assumptions

You have a working knowlege and access to Group Policy Management console, permissions to update ADMX templates and packaging rights within System Center Configuration manager.


The Goal - Deploy OneDrive For Business


In the my environment we currently have the following:

Windows 7 X64 systems which we are planning to migrate to Windows 10.
System Centre Configuration Manager 2007R3 which will die along with Windows 7.

This step-by-step walk-through will focus on deploying OneDrive to Windows 7 using this older SCCM version with a view to migrating user-data into the cloud prior to upgrading users with Windows 10.


Group Policy Configuration


Step
1.    Extract the Onedrive ADMX template downloaded from the above location.

2.    Open OneDrive.admx in notepad and edit it to include your tenant ID where it says {INSERT YOUR TENANT'S GUID HERE}” please note that you do not need to keep the curly brackets (or braces if you prefer) there are two entries to be modified.

3.    Edit the section that says {INSERT YOUR CHOSEN PATH HERE} to choose the default installation directory for OneDrive. In my case I have chosen the default to be C:\Users\%USERNAME%\AppData\Local\Microsoft\OneDrive.


Above: Highlighted areas have been altered.
4.    Save the ADMX file and then upload both the ADMX and ADML into your central store \\yourdomain\SYSVOL\yourdomain\Policies\PolicyDefinitions

5.    The next step is to customise the (limited) set of GPO options for your environment. In my environment I only want to deploy OneDrive to Laptop computers, due to this I’ve created two policies relating to OneDrive Settings.

The G_U_M_Global_OneDrive_Pilot – Contains both user and computer settings that can be applied to all users to have OneDrive installed.  This is currently assigned at the Grants_Zones level and applies to all users and machines in the lower rationalised group. It is being security filtered to a security group called “S_Grants_OneDrive”. It contains the following settings:


These settings are applied to the computer object. They prevent using the “remote file fetch” feature of OneDrive. 


“Automatically Launch the Onedrive Client FRE in business mode” – Makes OneDrive for Business the default logon experience instead of domestic OneDrive.

“Configure machine to receive updates after consumer Production” – Delays the updating of OneDrive to the latest consumer version (essentially allows MS to test the production on consumers first)

“Prevent users from configuring personal accounts” – Stops users from adding their own personal accounts. Business account only.


6.    That’s all the settings you get on the latest ADMX template. Additional settings such as bandwidth utilisation and enabling ADAL must be entered as registry keys. I’m deploying the following Keys via GPO.

Enables Microsoft Azure Active Directory Authentication Library (ADAL) – Modern authentication


Enables Silent Account Configuration.

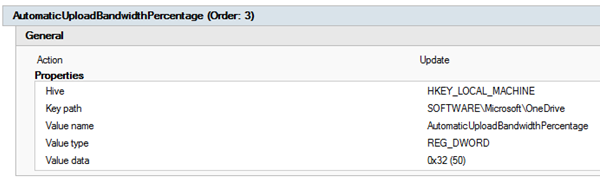
Limits upload bandwidth usage to 50% of available.

Other registry settings are available and a complete listing can be found here:


7.    In addition to this, I also created a new environmental variable called “OneDriveSync” in the same policy, this will allow easier direction to the OneDrive folder. This is set to only be created if the OneDrive folder exists and points to %userprofile%\OneDrive – My Organisation Name


8.    Next I’ve created a shortcut to the OneDrive Executable on the user’s desktop, this will be useful either for the user to initiate the installation of the OneDrive software if the user clicks it, or if it already exists access the OneDrive Contents. I’ve called the shortcut “My OneDrive” the it points to %localappdata%\microsoft\OneDrive\OneDrive.exe


9.    Next I’ve set up a scheduled task, This task will launch the OneDrive executable for the first time. (as by default OneDrive is not normally launched until the user initiates it) the task will be set to run as %loggedondomain%\%loggedonuser% and points to the OneDrive Executable at %localappdata%\Microsoft\Onedrive\Onedrive.exe 


10.    The next GPO is called G_U_M_Global_Folder_Redirection_OneDrive_Loopback – this applies only to laptop Devices, it is set to be first in the processing order ahead of any existing folder redirection policies. Again, it is security filtered to the same security group. S_Grants_OneDrive. In my environment loopback processing is enabled in “merge” mode due to previous folder redirection policy and location of Users OU.

11.    Under the user settings > Policies> Windows Settings > Folder Redirection  the following redirects have been put in place to redirect Contacts, Desktop, Documents, Links, Searches, Music, Start Menu, Videos, Pictures and Saved Games to the relevant %OneDriveSync%  folder and copy any existing contents to this location.

shows redirection of contacts and documents

shows redirection of links, music, start menu, videos.

Shows folder redirection of Pictures, Saved Games and Searches.

SCCM Package Configuration

12.    Next, the SCCM job for Deployment of the OneDrive for Business software was created. Using the OneDrive Executable downloaded earlier, this was copied to my source share. 


13.    In addition I have copied a customised deployment notification script I will call prior to installation, this includes a countdown. The file can be customised with any message. A copy of the code for this is available here. (just rename to .hta)


14.    An installation .cmd file was created and contains the following settings:


This was then saved into the SCCM source location with the OneDrive executable.

15.    Next an SCCM package was created containing the deployment. 

The program triggered is peruser_business_2.cmd – this is the .cmd file we created previously. This is set to run “hidden” to prevent user interaction.

Estimated disk space was set to 300MB, time allowed was 10 minutes to complete installation (in reality it will be much faster). The program was set to be allowed to run on any platform.

The program was set to run “only when a user is logged on” – this is necessary because OneDrive is a per-user program rather then per-machine. The program is set to “run with the users rights” and requires a drive letter (as we will be running a .cmd this is to avoid issues).

In the advanced tab we have set to “run another program first” and then selected our deployment notification we created earlier. This was set to “always run this program first” and “run once for every user who logs on”.


16.    A deployment collection was created , for the moment this is simply a static collection that we will manually add systems to. In the future for deployment, the deployment groups will be staged in here. Eventually this will contain all Windows 7 laptop devices in the estate.


17.    The Advertisement for deployment was created with the following settings:

The package, program and collection are set to the ones we just created.

Advertisement start time is set from creation date, no expiration date. Set to run “as soon as possible” and “rerun if failed previously” has been configured.

Program was set to “run from distribution point when on LAN network boundary and set to “do not run program” when on slow or unreliable network boundary – this will prevent the job from starting on machines that are not on the internal network. (as we cannot verify the GPOS have been applied before deployment)

Included is the option to “allow users to run the program independently of assignments” that will allow users to trigger the installation themselves in the event of an error, or re-installation being required.

This is the completed configuration required to deploy OneDrive silently without user interaction . Below will attach a run-through of the end-user experience during deployment. I hope this has been useful to someone. If so, please leave a +1. Many thanks.


Wednesday 28 February 2018

Quick Tip - VSS Restore Source Path Too Long Error


Getting this error when trying to restore via VSS?

"The source file name(s) are larger than is supported by the file system. Try moving to a location which has a shorter path name, or try renaming to shorter name(s) before attempting this operation."

In my scenario, a user had accidentally deleted a folder containing 78GB of data. This user was privileged user account. Accidents happen and I guess this is why we do backups.

Not to worry, there is a really simple solution to this.

Right click on the share:
Choose “properties”
Go to “Previous Versions”

Locate the snapshot that contains the missing data and click “open”


Find the folder you want to restore, right click on it and choose “properties”
Copy the “location” to your clipboard. (this is the path to your snapshot)


Firstly, Create a new folder at your restore destination. I created a folder called “GIRVAN” at \\myrestoredestination\share (the same name as the missing folder)

Open Powershell
Type the following:
Subst X: paste your snaphot location\foldername

eg: in this example I pasted
\\myrestorelocation\share\@GMT-2018.02.26-09.00.10\GIRVAN

On the next line type:

Net use v: \\myrestorelocation\share\GIRVAN (Where girvan is your folder name to restore to)

Now lastly type :
Robocopy x: v: /E /COPYALL

Files will then start to copy from the snapshot back to the folder.


Tuesday 20 February 2018

Quick Tip - Refresh Computer Security Group Membership Without Restarting

Created a new group policy but it's not applying? Can't restart the computer? This little tip will allow you update security group membership and apply your new GPO without the need to restart.

Above: The GPO I want to apply highlighted
I've just added the computer to the required security group to apply the group policy, but the computer doesn't yet realize it's a member of this security group.

output of gpresult /r showing computer security groups

I now run the command below:

klist -lh 0 -li 0x3e7 purge

Then run a gpupdate /force


This time when I run the gpupdate /r I can see that the policy has now applied and security group membership has been updated.


If you found this useful, as always please leave a comment or +1. Thanks 

Andrew

Monday 19 February 2018

Quick Tip - How to check if Office 2016 is licensed

Need to check if Office 2016 is licensed? Below is a quick and easy way.


From an elevated command prompt browse to:

c:\programs files (x86)\Microsoft Office\Office16\

type the following command:

cscript ospp.vbs /dstatusall


You will then be presented with a list of Office Products which will show the licence status.

OOT_GRACE indicates the product is in grace period, it will also show the remaining grace days.


being correctly licensed will simply show as "LICENSED".


If you receive this error, check the KMS server in use, it's possible you may need to add the KMS licence key to the server.


Kms activation should occur naturally by itself, but can be forced to activate using cscript ospp.vbs /act hostname

You can see a complete list of OSPP.VBS commands below:

Global /Options
Description
/act
Activate installed Office product keys.
/inpkey:value
Install a product key (replaces existing key) with user-provided product key. Value parameter applies.
/unpkey:value
Uninstall an installed product key with user-provided partial product key (as displayed by the /dstatus option). Value parameter applies.
/inslic:value
Install a license with user-provided path to the .xrm-ms license. Value parameter applies.
/dstatus
Display license information for installed product keys.
/dstatusall
Display license information for installed licenses.
/dhistoryacterr
Display MAK/Retail activation failure history.
/dinstid
Display installation ID for offline activation.
/actcid:value
Activate product with user-provided confirmation ID. Value parameter applies.
/rearm
Reset the licensing status for all installed Office product keys.
/rearm:value
Reset the licensing status for an Office license with user provided SKUID value (as displayed by the /dstatus opton). Value parameter applies.
/ddescr:value
Display the description for a user-provided error code. Value parameter applies.
KMS client /Options
Description
/dhistorykms
Display KMS client activation history.
/dcmid
Display KMS client machine ID (CMID).
/sethst:value
Set a KMS host name with user-provided host name. Value parameter applies.
/setprt:value
Set a KMS port with user-provided port number. Value parameter applies.
/remhst
Remove KMS host name (sets port to default).
/cachst:value
Permit or deny KMS host caching. Value parameter applies (TRUE or FALSE).
/actype:value
Set volume activation type. Value parameter applies. (Windows 8 and above support only)
Values: 1 (for AD) or 2 (for KMS) or 3 (for Token) or 0 (for all).
/skms-domain:value
Set the specific DNS domain in which all KMS SRV records can be found. This setting has no effect if the specific single KMS host is set via /sethst option. Valueparameter applies. (Windows 8 and above support only)
Value:FQDN
/ckms-domain
Clear the specific DNS domain in which all KMS SRV records can be found. The specific KMS host will be used if set via /sethst option. Otherwise default KMS auto-discovery will be used. (Windows 8 and above support only)
Token /Options
Description
/dtokils
Display installed token-based activation issuance licenses.
/rtokil:value
Uninstall an installed token-based activation issuance license with user-provided license id (as displayed by the /dtokils option). Value parameter applies.
/stokflag
Set token-based activation only flag. (Windows 7 support only)
/ctokflag
Clear token-based activation only flag. (Windows 7 support only)
/dtokcerts
Display token-based activation certificates.
/tokact:value1:value2
Token activate with a user-provided thumbprint (as displayed by the /dtokcerts option) and a user-provided PIN (optional). Value parameter applies.

Sunday 18 February 2018

Packaging and Deploying Oracle Java runtime in SCCM 2007


Having trouble packaging Oracle Java in SCCM? Can't find the MSI? Once you installed Java you still have the old version as well? Today I'll explain how I to successfully deploy Oracle Java while removing older versions and be able to keep your estate to a standardized version.


1.    Visit http://www.java.com/en/download/ for the latest Java version
2.    Click “All Java Downloads”


3.    Select the “Windows Offline” version.


4.    Right click on the program and click “Run as administrator”, enter your EA credentials

5.    When the Java Welcome Screen appears don’t do anything, leave this open but don’t click “install”.


6.    Browse to the following location. Replace with your own username.

C:\Users\%username%AppData\LocalLow\Sun\Java\

In this folder you will find a subfolder with the MSI version you are attempting to install. Copy this folder to your desktop. You can now click “cancel” on the open installer.

7.    Copy the the files to the source location you use for deployment and give it a relevant name.


8.    Open up the MSI in your favourite MSI editor. In this example I'm using InstEd and click on “Transform” > New Transform. Give the Transform file a suitable name containing the product and version it’s intended for


9.    Make any modifications required to the MSI transform.

In the case of Oracle Java, we simply must disable Automatic updates via “AUTOUPDATECHECK” on the Property table. But there are other common checks you should perform such as ProductLanguage must always be 1033 (English), AllUsers should be set to 1 (this specifies a per machine context). Always ensure to create a new Transform file for each new version.


10.    Click “File” and Save, press OK when prompted.


10. In the SCCM Console, browse to software distribution > Packages and right click and choose New > Package from definition.


11.    Click next, Browse and then browse to the location of the extracted MSI, select the MSI.


12.    The Wizard will now show the product and version number, ensure this is correct and then click next. It’s important to check that this information is correct as this has the potential to replace a previous piece of software in the database. There have been several occasions where the version number clashes with a previous one. In this case you can contact the vendor and ask them to supply a changed version, or you can alter the version number for yourself in Instead (property table).


13.    Select “Always obtain files from the source directory” and click Next.
14    Click Next


15.    Click Finish


16.    Expand the new package on the left-hand pane and click on “distribution points”


17.    On the right-hand pane click “New Distribution points” and the click next on the wizard once it appears.

18.    Select the the relevant distribution point and click next. Note you will want to distribute the package to all distribution points once testing is completed. Do not copy the package to any shares marked SMSPXEIMAGES$ 


19.    Click “Close”

20.    On the left-hand pane right-click on “Programs” and select New > Program.


21.    Enter the Program name “Install Vendor, Product, Version”

eg: Install Oracle Java 8 Update 8.0.40.

22.    Enter the installation string under “Command Line”

eg: msiexec /i jre1.8.0_40.msi TRANSFORMS=Oracle_Java_RT_8040_AA.mst /qn

Click Next.


23.    Select the platform the program can be run on. Click Next.


24.    Select “Whether or not a user is logged on” and click next.


25.   In my organisation I'll be using the program for OSD and completely silent installation. I'll choose “Suppress Program Notifications” and “Allow this program to be installed from the install software task sequence without being advertised”.


26.    Select “import” and choose the installer you used, this will the import the product GUID and enable MSI source management. Record this GUID, we will use it later. Click Next.


27.    Click Next and on the review all details page click next again.

28.    Check the program creation was successful (indicated by green ticks) then click Close.


29.    We will now create a new Program to remove this version of Java, the steps for this are essentially the same as those for the first program. This time, we will use the program GUID that we recorded earlier to remove the software; this will ensure that only this unique version will be removed.

 **Important** do not enable MSI source management for the removal job.

eg: the full uninstall sting is msiexec /x {26A24AE4-039D-4CA4-87B4-2F83218025F0} /qn


30.    Right click on collections and create a “New Collection” and fill in the name of the collection name, click Next.


31.    Click Next 


32.    Press “OK” when prompted with "the collection has no membership rules" we will resolve this later. Click next, then Finish.


33.   The newly created collection will then show in the left-hand pane. We will now create a sub-collection within this collection for the pilot group. Essentially the process is a repeat of the above steps with the collection name changed. When you have done this you will have a collection within a collection similar to below.


34. We will now generate a report of all versions of Java within the estate so we know which version we need to remove.  On the left-hand pane click “Asset Intelligence” > “Asset Intelligence Reports”. On the reading pane beside “Look for” enter Search for installed software”.


35.    Right Click the report and choose “run”

36.    When the report appears select “values” and select the SMS00001 collection (all systems). Enter %Java% in the “Enter a part of the product name” field and then click “Display”

37.    The report produced will show all known Java versions in the estate, we are interested in the “Software ID” field, these GUIDS will be used these to ensure that all previous versions are removed from a system before installing the new version. Keep this report open.

**Important** Programs other than the one you are searching for may appear


38.    Open the location you stored your Java MSI and create a new text document in notepad, save as“Oracle_Java_Removal.cmd” file and reopen this up with notepad.

The .cmd should start with the following tasks to close open browsers and kill relevant processes that may stop the uninstall from being successful.

@ECHO OFF
REM Close all open web browsers
:killfirefox
taskkill /f /t /im firefox.exe
tasklist /FI "IMAGENAME eq firefox.exe" 2>NUL | find /I /N "firefox.exe">NUL
if "%ERRORLEVEL%"=="0" GOTO killfirefox
:killiexplore
taskkill /f /t /im iexplore.exe
tasklist /FI "IMAGENAME eq iexplore.exe" 2>NUL | find /I /N "iexplore.exe">NUL
if "%ERRORLEVEL%"=="0" GOTO killiexplore
:killchrome
taskkill /f /t /im chrome.exe
tasklist /FI "IMAGENAME eq chrome.exe" 2>NUL | find /I /N "chrome.exe">NUL
if "%ERRORLEVEL%"=="0" GOTO killchrome
REM Close all JAVA Background Processes
:killjusched
taskkill /f /t /im jusched.exe
tasklist /FI "IMAGENAME eq jusched.exe" 2>NUL | find /I /N "jusched.exe">NUL
if "%ERRORLEVEL%"=="0" GOTO killjusched
:killjucheck
taskkill /f /t /im jucheck.exe
tasklist /FI "IMAGENAME eq jucheck.exe" 2>NUL | find /I /N "jucheck.exe">NUL
if "%ERRORLEVEL%"=="0" GOTO killjucheck
:killjqs
taskkill /f /t /im jqs.exe
tasklist /FI "IMAGENAME eq jqs.exe" 2>NUL | find /I /N "jqs.exe">NUL
if "%ERRORLEVEL%"=="0" GOTO killjqs

 Next  add your GUIDS from the report line by line in this format.

msiexec.exe /qn /norestart /x {B048D821-636D-43D9-82EC-8B0010734231} 
msiexec.exe /qn /norestart /x {726880D7-98DE-41CC-B553-E6084260CFB7} 
msiexec.exe /qn /norestart /x {0C933B8C-1154-4EC8-8832-55CEAACA3B13} 
msiexec.exe /qn /norestart /x {3076929A-FB47-4CB7-A8FF-72CB95C22F95}

End the script with 

exit /B %EXIT_CODE%

Ensure to save the script.

**IMPORTANT** you should also INCLUDE the GUID of the latest version you are deploying. This will ensure that any installations of that version on the estate are the managed version you have distributed from SCCM.


 39.    Now open the SCCM console and browse to “Software distribution” > Packages and find your Java package. Click “Update distribution points” on the right-hand pane. When prompted by the “Confirm Update distribution points” box click “Yes”


40.    In the SCCM Console browse to “Operating System Deployment” > Task Sequences >Create a new "basic task sequence called "Install Oracle Java Versionname". 

41.    Right Click on the newly duplicated task sequence and click “properties”

42.    In the “Name” field, update it to the include the include the product and  latest version you are deploying. Press “Apply” when finished.


43.    Back to the main console window, right click on the newly renamed task sequence and choose “edit”

44.    Create a new group at the top level with the version being deployed. inside this add a "remove all oracle java" step as a "run command line". Ensure to set the package to the Java package you created earlier. I've also set the "continue on error" option for this in case there is an unknown exit code returned.


45.    Add a "delay step as step 2" this is just a "run command line" step with the command set to ping a loopback address for approx 20 seconds.


46.    Lastly add a "install program" step and add the program we created earlier, ensure the "install" program is selected.


47.    Right click on the newly created Task Sequence and then click “advertise”.

48.    Click “Browse” beside collection: and then select the “Pilot” collection you created earlier. Click OK.


49.    Click Next


50.    Click the “Sun” button beside “Mandatory assignments” and select “Immediately after this event” and “As soon as possible” from the drop-down menu, click OK.


51. Select “High” priority, and “Always rerun program” and click next.


52.     Select “download all contents locally before starting task sequence”, “when no local distribution point is available, use a remote distribution point” and “when no protected distribution point is available, use an unprotected distribution point”. Click Next.


53.    Click next three times and finally click close.


The pilot application is now ready for deployment testing. You can now add clients directly into the pilot collection, any previous versions of Java will be removed before installing the new version. 

When you are satisfied that your deployment works and removes all previous versions you should the create a new collection for rollout set it to refresh every day, use a query based collection to search for all systems with Java installed not at the same version you want to deploy (example below)

Exclusions for systems can also be added as below.


When this collection becomes empty, the deployment will have been successful to the estate.

You can keep track of the systems you've upgraded by using another collection with query containing the version you are deploying. (as below)


When you run the job all versions will be replaced with this new version. You can keep your estate at this version by adding any newly released versions GUIDS to the removal script, or upgrade to a newer version by simply replacing the package with the new version.

I appreciate this is a long post, if you've stuck with me this far, thanks for that. As always feedback is appreciated by way of the comments section, also feel free to give me a +1 to help the search ranking of this page. Many thanks.